
By George Arnold
In the latest issue of Lone Warrior magazine, I described the ways in which I set up a recent miniatures game, using some solo ideas to take much of the control of the set-up out of my hands. The idea, of course, was to avoid — as much as possible — giving one side or the other the benefit of my own biases for or against.
I used dice to lay out the terrain for my table, to choose the forces involved and, finally, to (mostly) deploy the forces the dice had chosen. (Hat tip to Chris Hahn for the last one especially. He’s long been leading the way on randomized deployment.) On the whole, I was satisfied with the way things worked out. You can read more about that in issue No. 189.
In the article, I gave only a brief outline of the battle itself and mentioned that I’d give a fuller description here on the Lone Warrior Blog. And that is what follows:
(Photos, and more, below)
The battle was between two armies of mid- to late-15th century Italian city states, long-time rivals Florence and Siena. Although civic military units also were involved, many of the troops were condottieri, the mercenaries that made up large parts of the Italian military forces of the time. The action played out on a gridded board of offset squares (which function much like hexes in other games). Here’s a photo of the board before deployment, showing the terrain, which consists of highly stylized foam cut-outs:

The photo is from the Florentine side of the field and shows a smaller hill on the left, a larger hill in the center-right, and a marsh in the far center-left.
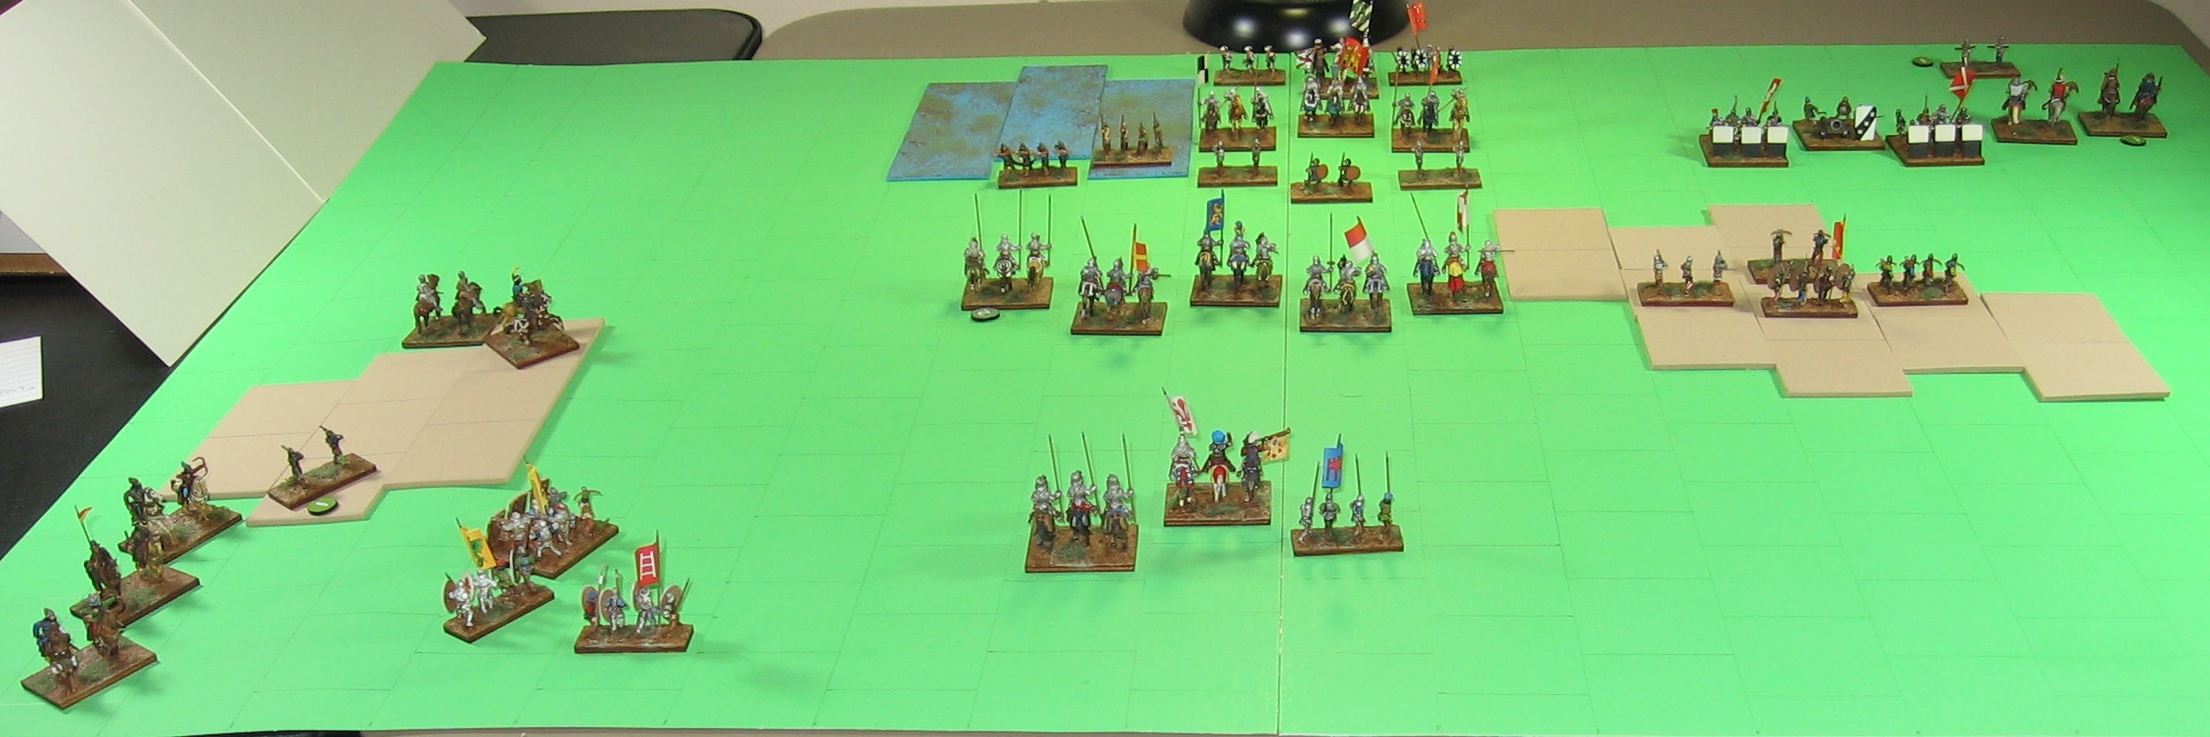
And here is the initial deployment of the troops:

Both sides deployed the bulk of their heavy cavalry in the center, with most of the infantry and light cavalry on either flank. One feature of the deployment was that each side had a reserve behind its center, consisting of the army generals, each with some supporting troops. Note that the Florentines heavily outnumbered the Sienese in heavy cavalry, while the Sienese had a decided edge in light cavalry. (Detailed orders of battle are in the LW magazine article too.)
For rules, I used a considerably modified version of the Commands & Colors: Ancients rules. And, instead of using the standard C&C method of drawing cards to drive the action, I once again tried a system of rolling 1d6s for each side, with the high number getting that number of initiatives for that turn. I’d tried that system once before, in a Napoleonics game, with the potential drawback that one side or the other could get a long run of initiatives (winning the dice rolls repeatedly) and that the other side could do little more than get pounded into submission, while waiting in the hope that the initiative would swing its way again.
In fact, that’s exactly what happened with my Naps game. One side overwhelmed the other with an uninterrupted string of initiative wins. So, I decided that, in my next outing, I’d try an artificial rule that limited “runs” of initiative to three in a row for either side. So, if one side did get three initiatives in a row, the next die roll for initiative would automatically go to the other side.
Here’s what happened with the Condottieri game, the so-called Battle of Rigatoni:
On Turn 1, Florence wins 4 initiatives. Seeing the mass of Sienese light cavalry opposite the Florentine left, the left begins falling back to protect the rear of the Florentine position. The Florentine center and right both advance.

On Turn 2, Florence again wins 4 initiatives. They are used to continue the redeployment by the left, while the right advances again, with the light cavalry trying to ride down a Sienese skirmisher crossbow unit, which evades (falls back) before the advancing light horse without suffering any casualties.

On Turn 3, the initiative swings to Siena, which rolls a 5. Siena advances the five units of light cavalry on its right and uses the other initiative points to shoot with various missile units facing the Florentine center and right. Siena scores only one hit with the shooting, however.

Siena wins 6 initiatives on Turn 4 and continues to advance its light horse on its right, driving a Florentine skirmish unit off the hill on that side of the field. Again, Siena uses the rest of its initiatives to shoot at the Florentine center and right. But, again, the shooters score only a single hit.

Turn 5: For the third time in a row, Siena rolls the initiative, this time a 4. Siena presses the attack by its light cavalry, which has split into two groups. Three units turn toward the Florentine infantry defenders and score a hit on the Florentine skirmishers, while two of the light cavalry units begin turning toward the flank of the advancing Florentine men-at-arms in the center.

On Turn 6, Florence regains the initiative, with a score of 6. (I didn’t record whether Florence won the initiative outright or because of the “three wins in a row and you automatically lose the fourth” rule. My recollection is that Florence won this turn’s initiative outright.) The Florentine left, still under threat from the Sienese light horse, continues to regroup. On the far right, the Florentine light cavalry pushes the opposing skirmisher crossbows back again, inflicting a hit on them. In the center, a single Florentine men-at-arms unit charges a heavy crossbow unit and scores two hits, but the crossbows stand their ground and get a free “Battle Back,” (counterattack) inflicting two hits on the men-at-arms and driving them back in retreat.
On Turn 7, Siena wins 6 initiatives. Two light cavalry units move to threaten the flank of the Florentine men-at-arms in the center, while the remaining three light cavalry units attack the Florentine defending infantry, causing a total of five hits and suffering one themselves from a Florentine Battle Back. In the center, the Sienese mercenary longbows move forward out of the marsh.

On Turn 8, Florence rolls up 6 initiatives. The beleaguered left finally straightens out its line, one men-at-arms unit turns to face the threat from the three Sienese light cavalry units, and the remaining men-at-arms in the center advance to contact the screen of Sienese skirmishers. Meanwhile, the Florentine general and reserve begin to advance and the Florentine light horse on the right score another hit on the pesky Sienese skirmishing crossbows.

The initiative shifts back to the Sienese on Turn 9, with a score of 5, all of which are used to fight melees. On the Florentine left, the Sienese light horse attack unsuccessfully and suffer three hits and two pushbacks from their opponents who stand their ground and Battle Back. The Sienese mercenary longbows in the center miss their shot, while the skirmisher crossbows on the Sienese left score a hit on one of the Florentine light horse units.

Florence gets 6 initiatives on Turn 10, but because of some rules confusion on my part that was overlooked in the heat of the moment, the Sienese light cavalry on the Florentine left attack anyway, destroying the Florentine pavisier unit, with one light horse unit slipping around the right flank of the Florentine defending infantry. In the center, three Florentine men-at-arms attack the opposing three Sienese skirmishers to their front, driving them back, eliminating one that is trapped against a supporting Sienese unit and breaks up (i.e. is destroyed). A bonus advance by one of the Florentine men-at-arms units destroys another Sienese men-at-arms unit, while a Battle Back inflicts two hits on one of the charging Florentine units.

Siena wins 6 initiatives on Turn 11 and its attacks in the critical center score hits on two Florentine men-at-arms units. One of the units takes two hits from the Sienese mercenary longbow unit but a Battle Back allows the Florentines to force the longbows to retreat. Other attacks have no effect.

On Turn 12, Siena again rolls 6 initiatives and continues to fight in the threatened center. Two Florentine men-at-arms units suffer hits, while a third is pushed back

Florence regains the initiative on Turn 13, with a roll of 4. On the left, a civic militia spear unit scores a hit and a retreat on one of the Sienese light horse units. In the center, one Sienese men-at-arms unit is forced back a square, while another is attacked and destroyed.

Florence gains 6 initiatives on Turn 14 and delivers more devastating blows. On the left, the militia spear unit scores a hit and a retreat on another Sienese light cavalry unit. A Florentine men-at-arms unit destroys another Sienese heavy cavalry unit and follows up by advancing and scoring two hits on the Sienese general’s unit. Things are looking bad for Siena.

On Turn 15, Florence rolls up 5 initiatives and goes in for the kill. One men-at-arms unit scores two hits on the Sienese heavy crossbow unit, while another heavy cavalry unit scores two hits and two retreats on the Sienese general’s unit. Backed up against its own baseline, the Sienese generals’ unit is destroyed. Based on the rule that a side that has lost its general and more units than the other side at the end of a turn loses the game, the victory goes to Florence. The results weren’t even close: a total of five Sienese units, including the general, to only one unit lost by the Florentines.
End notes: Once again, I was generally pleased with the method of rolling up shifting initiatives for a game. It provided a fast-moving contest with plenty of suspense on each of the initiative rolls, especially as the battle drew to a climax. The arbitrary rule of limiting each side to three initiatives in a row seemed to work well, although the end result was another overwhelming victory for one side. Perhaps the limit on initiative runs should be two, instead of three.
The glitch on Turn 10, when I mistakenly attacked with the Sienese light horse during Florence’s initiative didn’t really affect the outcome of the battle, even though it resulted in the only loss of a Florentine unit during the game.
The key to the victory seemed obvious — the original make-up of the armies. The Florentines simply had too many men-at-arms units for the Sienese to handle. There’s probably food for more thought there in how to randomize the orders of battle. Since my original idea was to work up OOBs that were significantly different between basically similar armies, I might have succeeded all too well — and unbalanced the game as a result!
There were some other conclusions about the game, but you’ll have to read about them in the Lone Warrior article. Yes, that’s a shameless tease, but subscribers deserve the perk!
An idea I had for the initiative would be to reduce the die roll by 1 for every previous consecutive initiative. e.g. If you won initiative last turn, minus 1 on your die roll; won the last three turns, -3. This way if you do win consecutively, your score still diminishes each turn (probably).
Great idea, StuRat! It looks well worth a try. I really like the idea of shifting initiatives, but there’s still some refining to do with it, I think.